Chapter Two: Studio Gear
4. Mixing Consoles | Page 6
The Master Section (continued)
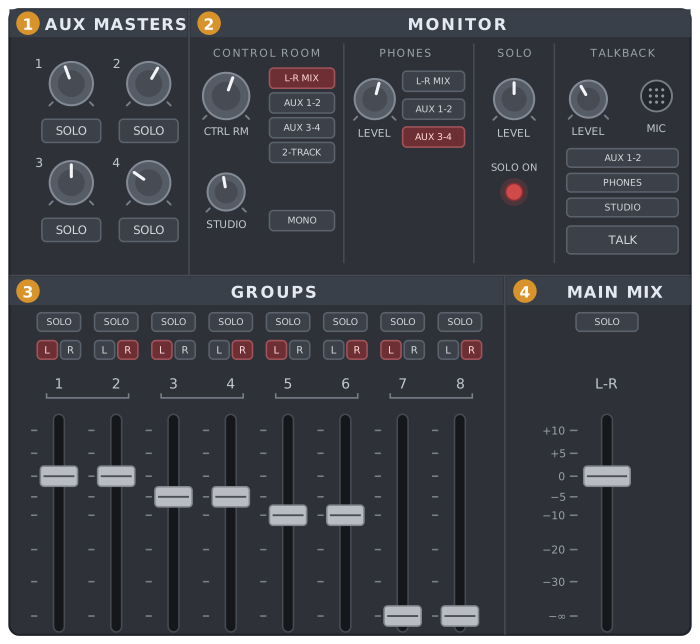
The whole master section—blocks 3 and 4 are on this page
3Group Outputs and Submixes
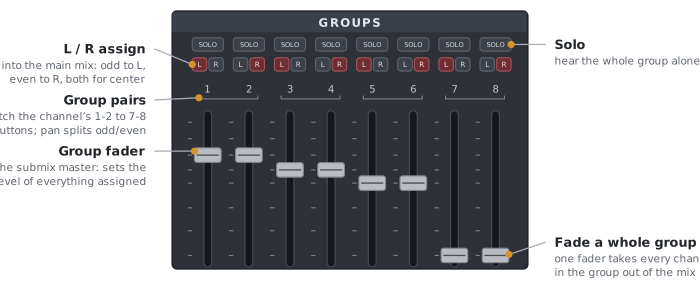
The output section has faders for the 8 group outputs (which are bus masters) and, on the right, the main L-R Mix (STEREO on some boards). Any of the buses can be soloed.
Most analog boards with groups can use the group outputs as subgroups for the Left/Right mix. This is referred to as a submix. For example, if you were designing a stereo mix but wanted one pair of group faders to control all your synths and another pair to control all your mics, you would follow this procedure:
- Unassign your mic and synth channels from the L-R Mix; otherwise they reach the mix twice, and the group faders can’t fade them out.
- Choose a pair of groups for the synths and assign the synth channels to it, then do the same for the mics (for example, mics to groups 1-2 and synths to groups 3-4, using the assign buttons on each channel strip).
- Pan each channel where you want it in the stereo image; with a pair of groups, the pan pot splits the channel between the odd (left) and even (right) group.
- Above each group fader, press L, R or both, depending on where you want the group in the main mix. To keep the stereo image, assign the odd-numbered groups to L and the even-numbered groups to R.
- If you want a mono subgroup, press both L and R; the group then sits in the center of the mix.
- These faders now act as subfaders to the L-R Mix fader, so you can fade out an entire group with a single pair of faders rather than grabbing all the individual channel faders.
On digital boards and in DAWs, a group is just one use of a general-purpose resource, the bus. A digital console may offer a dozen or more buses, and a DAW lets you create as many as your project needs. Each bus can carry a mono signal on its own, but most boards and DAWs also conveniently present them as stereo pairs (1-2, 3-4 and so on), so a stereo signal keeps its left and right sides. Recording a piece for chamber ensemble and electronics, for example, you might send your main stereo mics to buses 1-2, the string spot mics to 3-4, the wind spot mics to 5-6 and the electronics to 7-8. Each bus pair then gets its own fader strip, laid out much like an input channel; where a board shows the pair as two faders, you can link them, so that moving one moves its partner too—physically, on a board with motorized faders. In a live concert, that puts a whole section under one fader, right beside your input channels, where it is far easier to ride than a small aux master knob.
Nor does a submix have to end at the L-R mix. The string and wind spot buses can both feed a single spot-mic bus, which you then balance against the main stereo mics with one fader. A bus can also feed a recorder, a particular speaker in a multichannel array, or a laptop on stage. For live electronics, a bus carrying just the flute’s spot mic can go out to the laptop’s audio interface for real-time processing, and the processed sound comes back to the board on input channels of its own. Composers writing for film or games are often asked to deliver their music as submixes like these, called stems, so it can be rebalanced later.
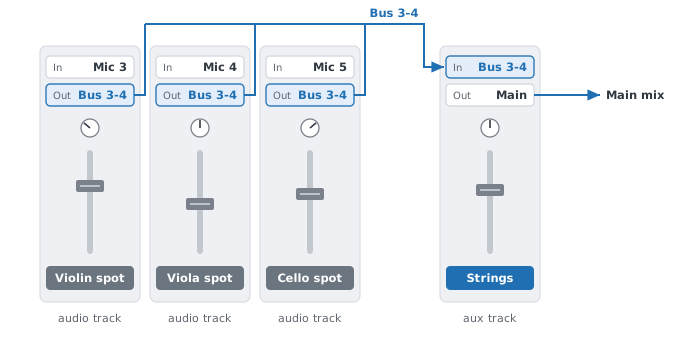
The string spot mics from our example, in a generic DAW. Each track’s output goes to Bus 3-4 instead of the main mix, and an aux track takes Bus 3-4 as its input, so its one fader controls all three. The reverb setup on the previous page used sends, which pass along a copy; here each track’s whole signal goes through the bus.
In a DAW, the submix master is simply an aux track whose input is the bus or bus pair, just as in the reverb setup on the previous page. An aux track holds no recorded audio of its own; it only passes along whatever arrives on its bus. If you are new to this, it is well worth practicing the setup in your own software, with the manual’s section on aux tracks at hand if you need it.
Because a submix carries audio, you can also process it as a whole: one EQ on the string spot bus treats every string mic at once. That is something a DCA cannot do, as the card below explains.
Digital consoles
DCAs: group control without a group

Both panels start from the same three channel settings. With a group, the channels are summed and one fader sets the level of the sum. With a DCA, each channel keeps its own path; pulling the DCA down 6 dB lowers every channel by the same amount, so their balance is unchanged and the channel faders never move.
Digital consoles offer a second way to control many channels with one fader. On the Midas M32 family (the M32, the compact M32R and their Behringer sibling, the X32), input channels can be assigned to any of eight DCAs (digitally controlled amplifiers). A DCA fader looks like a group fader but carries no audio at all. Rather than summing its channels into one signal, it reaches into each assigned channel and raises or lowers that channel’s level directly, by the same amount for every channel. The balance you have set with the channel faders is therefore preserved, and the faders themselves stay where they are—even though the faders on these boards are motorized. Returning the DCA to 0 dB puts everything back as it was.
Because a DCA works on the channels rather than on a combined signal, each channel keeps its own routing: the members of one DCA can feed different groups, aux sends or outputs, yet answer to a single fader. A DCA also cures a classic group problem. Pull down a group fader and the dry sound fades, but the channels’ post-fader reverb sends do not, so the reverb lingers on its own. Pull down a DCA and each channel’s level drops, taking its post-fader sends down with it.
DCAs are the digital descendants of the VCA groups on large analog consoles. There, each channel fader sent a control voltage to a voltage-controlled amplifier instead of passing audio itself, and a VCA master added its own voltage to every channel assigned to it, so one fader could ride a whole section without any audio passing through it.
4The Main Mix
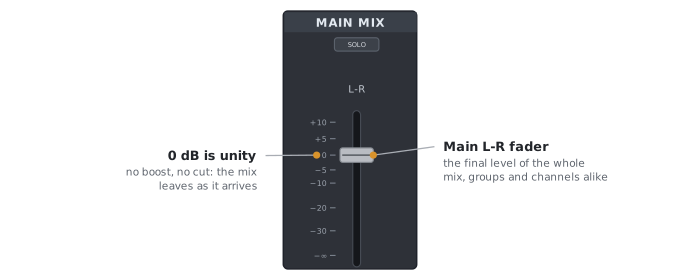
The main mix fader (labeled L-R in the figure, STEREO on some boards) sets the final level of everything reaching the main left and right outputs: the groups assigned to it and any channels assigned to it directly. Set it at 0 dB, unity, and do your balancing with the channel and group faders; that leaves the main fader free for fades at the start and end of a piece.
In conclusion, I highly recommend getting some experience with analog boards, or at least with analog board concepts, before delving into complex digital mixers. The understanding and skills you gain are well worth the effort, and they shorten the time it takes to become proficient with a more abstract device, where you see only certain key functions at a time, one screen or fader layer after another.
